Documentation contents
First steps with BFM tutorial
If you haven't done so already then download and install BFM.
Full instructions are
hereYou should have read the filing system overview
here.
Getting started overview
What we'll do is:
- Have a play with example files provided when BFM
is installed, then
- you can adjust the structure of the containers to
make a system that is logical for you, then
- start bringing in files
from wherever they are at the moment.
Don't worry if it looks like a lot of things to learn, BFM has been
designed to make things simple and we'll go through things a bit at a
time. You shouldn't need to write anything down. There are no fancy
mouse bits to memorise and everything happens at your own pace, one simple step at a time.
1 Start the program
Normally you start BFM like you'd start any other.
There might be a 'B' icon on your desktop, or in the quick-launch part of
the toolbar or you might need to click on Start then find BFM from that
menu.
Introduction to containers and contents
2 First look at the main screen
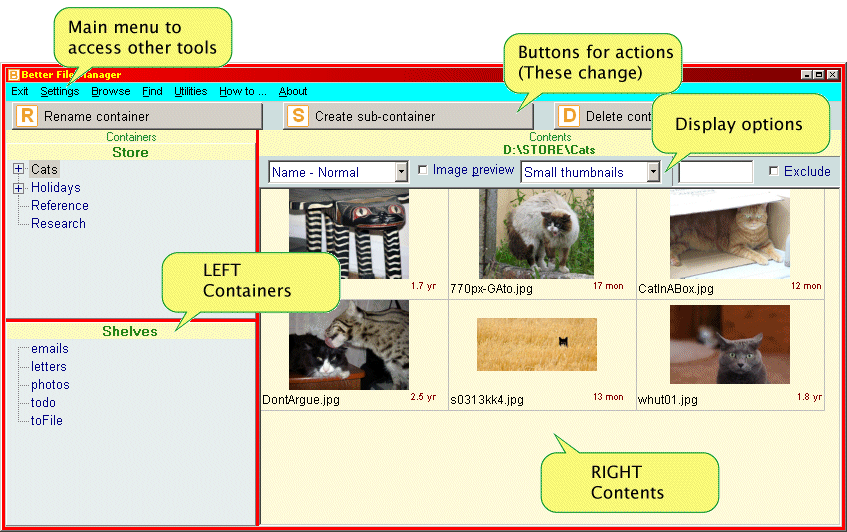
The colours in these screenshots may not match those on your system. For
example the borders and splitter-bars (for example the join between the
listing of containers and the listing of contents that can be moved) are
red and the menus are light blue.
See how the left is labelled "Containers" and the right "Contents".
We'll be using the left to navigate through the hierarchy of containers
and the right to select one or more files to play with.
Most of the BFM screens have a similar left/right split.
When BFM is first installed it sets up a STORE and SHELVES with some
examples. These are just to play with during this introductory
tour. You'll soon be organising your own files.
3 Adjust for comfort
You can adjust the size of the text to something that
is comfortable for you. From the main menu pick Settings.
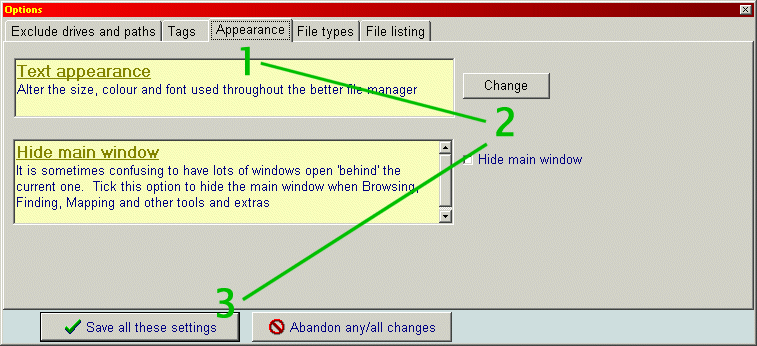
The options screen is organised as a set of 'tabs', used to adjust different aspects.
To set the font click on Appearance if it is not already selected, then the Change
button then finally the Save all these settings button.
More about options in general can be found
here4 Contents display
Let's look at the file display. Click once on the Cats container in
STORE to see something like this the display above.
-
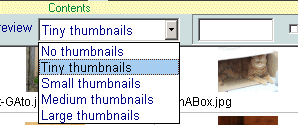
| Click on the little arrow on the thumbnails setting and experiment with the sizes. |
 |
- Click on the little arrow on name - normal box to change the orders in which the files are displayed.
As supplied BFM lists contents row by row. If you prefer them listed column by column
this can be changed in the
options - The box on the top right is a filter which can be used to include or exclude
files from the listing by name. For example typing x in the filter box will
select only those files with an x in their name.
- Don't forget to clear this after use. It goes yellow to remind you that some files
might being hidden.
- Experienced computer users might want to put a * or two in but wild-cards are not needed.
-
| If that wasn't enough excitement for one afternoon, you can see photos
one at a time in a separate window by ticking the Image preview box
then moving the mouse slowly over the list of contents.
The new window can be moved and sized to suit. Close it using the 'X' in
the top right or clicking on Image Preview again.
|

|
- The detail given about each file can be altered in the File listing part of settings.
(More details here)
5 Container display
To navigate through the STORE and shelves simply click on the containers listings
- Many are empty at the moment.
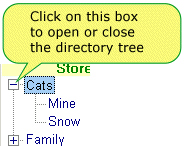 |
Clicking on the little plus and minus in a box in the containers expands or closes the
hierarchy. You will be using this a lot. |
| If you click on toFile in the Shelves you'll
notice that all these documents have a
little book against them to indicate some sort of written document. But
if you look at the file extension (the bit at the end of the name after
the dot) you can see they are in different formats.
(Also if you had the thumbnails on, as there aren't any pictures to show
the display has been compacted to save space.)
|

|
6 Buttons
You will have seen buttons with letters appearing and disappearing at
the top. These are there to guide you through managing your files and
containers. (In normal Windows you have to juggle with the mouse but in
BFM we make things simpler by separating the 'picking' from the 'doing'. As you
might have guessed a button with a big letter on it can be 'pressed' by using
that letter from the keyboard. We will spend some time exploring these in
a while but first a word on how to select documents to do something with.
7 Selecting files to work with
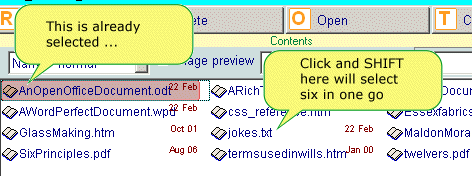
With a set of files displayed on the contents section simply start
clicking on them and see what happens. That's all there is to it - One click to
select and another to de-select. Once clicked a document file stays
selected.
If you want to select a block at a time then hold down the
shift key and click on the 'far' corner of the block.
We are going to jump ahead a bit and look at one of the tools that we
can use to keep our filing system neat and tidy. We'll return to the
everyday stuff soon.
Clutter Buster
Do you remember that we established a rule: Either a container contains
sub-containers or documents but not both? Our Cats container breaks this
rule as it has six document files and two sub-containers. It isn't the
end of the world but I'd really like you to try to keep containers and
their contents separate as it will pay off handsomely in the long run.
It's all very well having rules but no matter how sensible they are
they're not much good if you haven't got the tools to fix the job. This
is where the Clutter buster comes in. It does two things:
- Finds 'loose' files ...
- ... then holds your hand as you put them in a proper place.
8 Clutter Buster in action
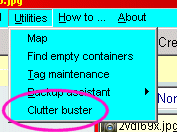
| Let's see how it works by selecting Utilities then
Clutter buster.
After a moment it will report what it has
found and give us the option to tidy up now.
|
 |
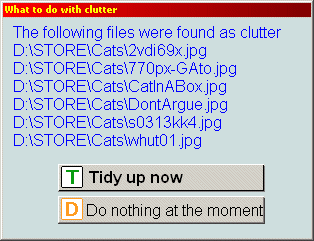 |
Since we've come all this way we might as well continue, so click on the Tidy
up now button or press T.
|
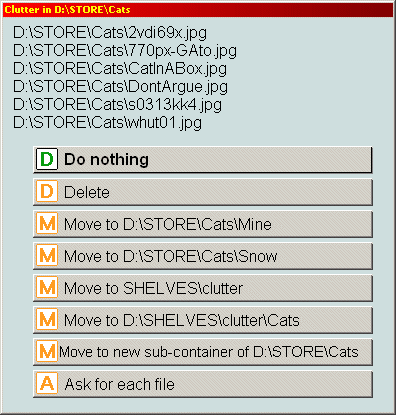
Now we get to the serious second part where we
have to decide where these files should go. Take a moment to study the
options. Points to note are:
- The clutter buster takes us through one container at a time.
- All but the bottom option work on all the documents together.
- The second and third options here are existing sub-containers of \Cats
- Or we might not be ready to file these properly yet and decide to put them in the SHELVES.
- If we put them in SHELVES we could look at them as thumbnails if they are pictures.
- Look carefully at the two options to move to SHELVES
- A general \clutter container
- A sub-container of \Clutter specially for these files
|
 |
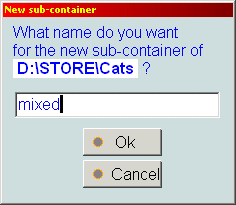 |
In this case all our photos are cats so it makes sense to file them in
the \STORE under \Cats (second last option). Click on that and give it a
name for the sub-container of mixed. Now the main contents
display should go be empty and there will be a new Mixed container under Cats.
|
You shouldn't have to use the Clutter buster very often but it's there
if you need it.
A few words about container and document names
- It is a bad idea to have spaces in container and document names.
- Generally stick to letters and numbers.
- Don't use a period except at the start of a file extension.
- Instead of spaces in names capitalise the first letter of each word.
not like this
not.like.this
ButLikeThis
BFM will do all this for you.
In the last exercise we called a sub-container mixed but it
now appears with a leading capital in the container listing. If we'd typed in
yet more cats BFM would have given us YetMoreCats.
Simple file operations
Deleting and renaming files is easy. Let's start with single files.
9 Deleting one file
| 9.1 | Go to the \Cats\Mixed container and show thumbnails of a convenient size. |
| 9.2 |  Click once on the 'wooden table' to select it. Click once on the 'wooden table' to select it. |
| 9.3 |  Either click on the delete button above or press D Either click on the delete button above or press D |
| 9.4 |  At the 'are you sure' click on the Yes button or press N At the 'are you sure' click on the Yes button or press N |
10 Renaming one file
| 10.1 | Click once on the cat in the corn field to select it. |
| 10.2 | Either click on the rename button above or press R |
| 10.3 |  Give it a more appropriate name. How about cat in a cornfield ... Give it a more appropriate name. How about cat in a cornfield ... |
| Uh oh! What's this?
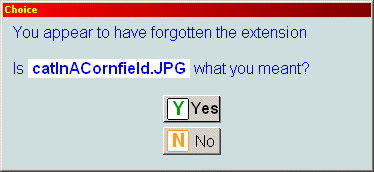
BFM has twigged that we've forgotten the .jpg extension and extensions are very important
(see box below). It's not forcing an extension on us, simply asking us what we really want.
This means you can forget about extensions when renaming but you will be always be prompted just in case.
|
| Note how the spaces in the name were closed-up and capitals added as described above.
|
A word about file extensions
A file extension is the bit at the end of a
filename following the period. Here are some common ones you might come
across
| .htm or .html | Web page opened by a web browser |
| .doc or .docx | Microsoft Word document |
| .pdf | PDF opened by Acrobat reader |
| .txt | Plain text. Notepad would work on this. |
| .exe | Program |
| .jpg or .jpeg | Photograph |
It doesn't matter if these are in upper or lowercase but they need to
match the internal format of the file because for example it wouldn't
make sense say to try to edit a program in a word processor.
999 times out of a thousand when renaming files leave the extension well alone. BFM
will help you if you forget.
Deleting multiple files
Just highlight a bunch of files and follow the same prompt. That's so easy we won't practice it.
11 Renaming multiple files
You often want to rename photographs that have
been uploaded from a camera. Or there are a bunch you'd like to add a
bit more information to in bulk. We'll now see just the basics of how
that is done.
| 11.1 | Click on the \Cats\Mine container and set the thumbnails to a
convenient size. Here we have pictures of two lovely animals called Robo
(the small clever one, sometimes called "TB", short for two breakfasts) and
BlackJack (the large softy) which ought to be properly labelled. Let's
start by renaming the photos where both animals appear together.
|
| 11.2 | 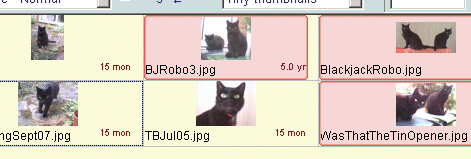
Select the three photos where they appear together by clicking on
them. Now press R or click on the Rename button. |
| 11.3 | 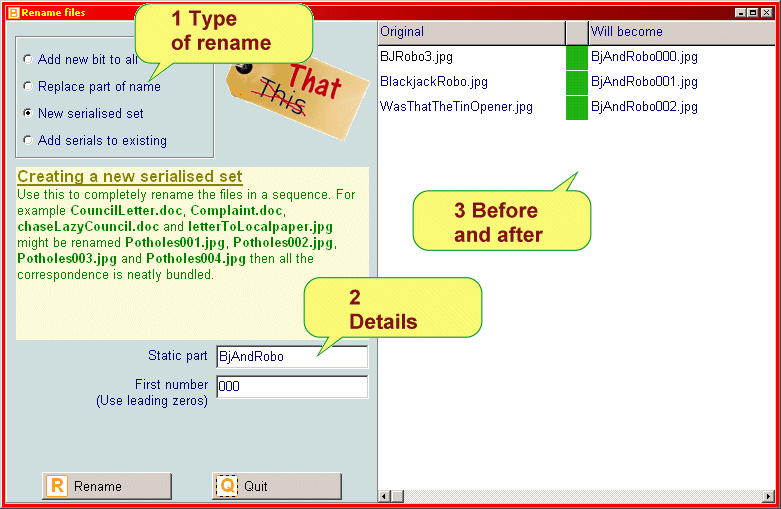
Here is a screen that leads you through the many possible ways of renaming a bunch of documents. The
controls are on the left and what the results will look like are shown
on the right. Note that the display on the right is only a preview.
Nothing actually happens until the Rename button is clicked.
Renaming will be dealt with in full later as an advanced topic here. |
| 11.4 |
For this exercise I want to completely rename the three photos so they
are consistent. Obviously they can't all be given exactly the same name
so this is going to be a fixed part followed by a counter.
After clicking the New Serialised set option and
typing in the static part, BjAndRobo the variable part is added in to the new names
appearing in the third column. The green squares are traffic lights that
would warn us if for example we were going to end up with duplicate or illegal names.
|
| 11.5 | That looks good so hit the R-button to do the dirty deed. |
| 11.6 |
There are two pictures of Robo ProwlingSept07.jpg and TBJul05.jpg that
don't actually have her name on them. We could use the same renaming
style as we used above in 11.4 but that would give us Robo001.jpg and Robo002.jpg which
loses the dates. Here's how to add a new bit without losing the old.
- Select the two pictures of Robo ProwlingSept07.jpg and TBJul05.jpg then press R or click on Rename.
- Select the Add new bit to all style...
- ...and put it at the front.

- After checking the preview, click on Rename and the job is done.
|
Later on we'll see some good uses for renaming in bulk.
Moving and copying files
Many people find the standard Windows methods for moving and copying confusing and prone to error.
Worry no more! Just as renaming and the Clutter buster held your hand,
so moving and copying is a steady process where you can see what's going on all the time.
Now we've got a \Mixed container for cats let's put all the snow-cats in there as well. Here's how:
| 12.1 | Go to the \Cats\snow container and select all three cats.
There is a special shortcut that is common to many Windows programs
to 'select all'. Hold the Ctrl key and press A. Doing it again deselects all.
|
| 12.2 | Press M or click on the Move/copy button |
| 12.3 | 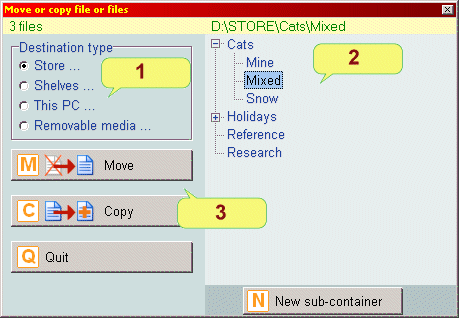
Again the controls are on the left.
The right hand half shows the containers in \STORE.
You should recognise these and have no problem
clicking on the + of \Cats to show the sub-containers.
|
| 12.4 | Click on Mixed which is where we want the files to go. |
| 12.5 | Click on the Move button and confirm. |
That's it for simple moves inside the \STORE and SHELVES. You can put things in SHELVES by
selecting the second Destination type.
There are more advanced options described here that we'll be using later but for now that's it!
Other file buttons
O is for open
That's it! Select a file then hit the O-button and if there is a program on your computer that knows how to
work with that particular sort of file then that program will be run with the selected file.
- Open is only available when a single file is selected.
- This uses the file extension to tell what program to use.
T is for tags
This is an advanced topic explained here but just to give you a flavour,
tags are key words that are added to filenames that stand out,
can be searched on, and can be highlighted in the listing to make them stand out more.
This sort of thing is handy if some file 'belongs' under one category but might need
to be retrieved by another. A typical use might be to label photographs with names of
people in them in a standard way which would 'cross container boundaries' when appearing
in say \family and \holidays.
How do I?
| Create a new file? | By running the program that uses that sort of file. There is no way in BFM to create a blank file. |
| Create and delete containers? | Click on a container to see the choice of buttons at the top.
- When creating a sub-container you'll be given options to ensure the structure is kept clutter-free.
- When deleting a container you'll be given options if it isn't empty.
We will be doing this in the second part of the tutorial
|
| Create a top-level container? | Click on STORE or Shelves.
We will be doing this in the second part of the tutorial
|
| Move all my files from My documents etc. into \STORE? |
Good question and that's what we'll look at next with a whole walk-through of its own.
Rest assured BFM will help you ferret out files from wherever they have ended up. |
| |
Summing up the first tutorial
I hope you can see how BFM helps you organise your files in a logical fashion at a steady pace using
one-step-at-a-time methods. In particular
| You have the skill to | move/copy/rename/delete/open files in \STORE and SHELVES. |
| You understand | how \STORE and SHELVES work together to give a balance between permanent
and temporary filing system |
| You are looking forward to | bringing your own files into \STORE and SHELVES and sorting them out. |
The next tutorial (
here) looks at the whole computer and
how to gather bunches of files from wherever they have wandered off to.


 Click once on the 'wooden table' to select it.
  Either click on the
  At the 'are you sure' click on the Yes button or press N
 Give it a more appropriate name. How about


