Documentation contents
Move and copy screen details
The Move and copy screen isn't really very complicated, but since you're likely to be
using it a lot it will pay to be familiar with the full range of features.
Basics

The basics of Move and Copy are covered in the first part of the tutorial (
here).
To recap:
- You'll already have selected one or more files then hit the M-button} which brings you to the move/copy screen
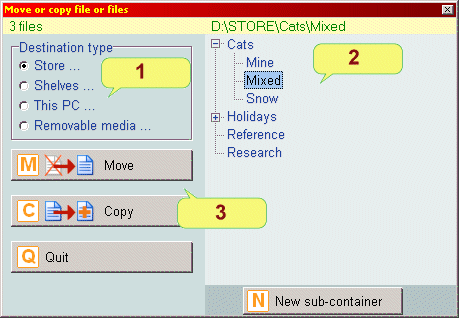
- Select a destination type from the top left ...
- ... then the actual destination from the right
- Now hit the M-button or C-button to do the dirty deed.
Now read on.
Store and shelves
| Working with the listing of containers is standard:
|
- * Expands whole branch
- + Expands container to show sub-containers
- - Collapses sub-containers
|
New sub-container
The N-button lets you add a new sub-container (or
directory, they're the same thing really) to the currently selected
container. This can be handy when you realise that what you're about to
move really belongs in a specialist place. This is very easy to use,
simply click on the N-button and give a suitable name. (Esc or enter
work to cancel or accept.)
The wider world of your computer
Sometimes you'll be shuffling files outside STORE and SHELVES.
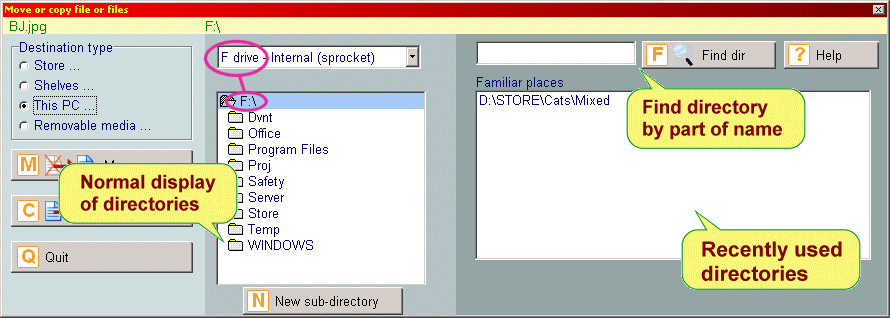
Click on This PC ... to see an expanded display.
 The middle section is a normal directory listing as
you've seen for shelves and store but only one branch is shown at a
time. It is worth finding out how this works with a bit of experimental
clicking. As you'll see each level is indented.
If you have more than one hard drive in your computer then you can select
as shown in the picture above by picking from the list at the top.
As clicking your way through this list can be a bit hit and miss and
time consuming there are two additional features on the right hand side:
Removable media
One of the common things you'll be wanting to do is to
put files onto a memory stick. The trouble with removable media such as
CDs and USB drives is that sometimes they're not connected and you'll
get messages to tell you this. (This can be annoying - see here for how
to tell BFM to ignore some removable media.)
Once you can 'see' the 'drive' this works the same as above. Pick a
directory or create one and away you go.
Documentation contents
 The basics of Move and Copy are covered in the first part of the tutorial (here).
To recap:
 The middle section is a normal directory listing as
you've seen for shelves and store but only one branch is shown at a
time. It is worth finding out how this works with a bit of experimental
clicking. As you'll see each level is indented.